This post contains affiliate links. Purchases may earn me a commission at no extra cost to you.
You’re staring at a blinking “P1” on your Rheem tankless water heater display, and the hot water just stopped. Don’t panic, this is one of the most common and fixable error codes on Rheem units.
The P1 error code on a Rheem tankless water heater means the unit detects insufficient water flow to safely ignite the burner. Your heater requires a minimum activation flow rate, typically around 0.4 to 0.6 GPM depending on the model, and when the internal flow sensor doesn’t register enough movement, the unit refuses to fire. This is a safety feature, not a malfunction in itself. The root cause is almost always a plumbing restriction, a clogged inlet filter, or a faulty flow sensor (flow turbine assembly).
This guide walks you through a systematic “outside-in” diagnostic approach. You’ll start with the simplest external checks and work inward to sensor-level testing, so you can determine whether this is a five-minute DIY fix or a job for a licensed technician.
Key Takeaways
The P1 code on a Rheem tankless water heater signals insufficient water flow (typically below 0.4–0.6 GPM) to safely ignite the burner, a safety feature triggered by flow sensor detection rather than pressure issues.
A clogged cold water inlet filter screen is the most common and easiest P1 fix—cleaning it with white vinegar resolves approximately 70% of cases before requiring advanced diagnostics.
Measure actual water flow in gallons per minute with a bucket and stopwatch rather than relying on pressure readings, as restrictions downstream can trigger P1 despite adequate static pressure.
Regular annual descaling flushes and quarterly inlet filter inspections are the most effective prevention methods, especially critical in hard water areas where mineral buildup accelerates.
If the inlet filter is clean, flow tests pass, and no crossover exists, the P1 code likely requires professional service for flow sensor replacement or heat exchanger descaling by a licensed technician.
What Does the P1 Error Code Mean on a Rheem Tankless Water Heater?
The P1 code is Rheem’s way of telling you the unit can’t confirm adequate water flow through its heat exchanger. Every Rheem tankless water heater, whether it’s the Performance Platinum series or a mid-range model, uses an internal flow sensor (sometimes called a flow turbine) to measure water movement. When you open a hot water faucet, this sensor spins and sends an electrical signal to the control board. If the signal is too weak or absent, the unit displays P1 and locks out ignition.
According to Rheem’s official support documentation, the minimum flow rate for burner activation varies by model but generally falls between 0.26 GPM and 0.60 GPM. That’s not much water, roughly equivalent to a slow kitchen faucet stream. So if you’re seeing P1 with faucets fully open, something is genuinely blocking or misreading the flow.
It’s worth understanding that P1 is different from a water pressure issue in the traditional sense. You could have excellent static pressure (say, 60 PSI at the meter) and still trigger P1 if a restriction downstream reduces the volume of water passing through the sensor. Think of it like pinching a garden hose, the pressure at the spigot is fine, but barely any water comes out the end.
One important note: the P1 code is a diagnostic starting point, not a final diagnosis. It tells you what the unit sees, not why. The real troubleshooting begins when you trace the flow path from the supply line to the sensor itself.
Common Causes of the P1 Code
After 15+ years of servicing Rheem tankless units, I can tell you the P1 code usually comes down to one of these culprits:
Clogged cold water inlet filter screen, This is the number-one cause. Sediment, mineral scale, and debris collect on the small mesh filter at the cold water inlet. In hard water areas, this can happen within months of installation.
Low incoming water flow or pressure, If your home’s supply pressure drops below roughly 15 PSI, or if multiple fixtures run simultaneously, the unit may not receive enough flow to activate.
Failed or dirty flow sensor (flow turbine), Scale buildup on the turbine blades can slow or stop the sensor from spinning. Electrical failure of the sensor’s Hall effect switch also occurs over time.
Plumbing crossover (sandwich effect), A defective mixing valve or single-handle faucet can allow cold water to back-feed into the hot line, confusing the flow sensor. This “sandwich effect” creates intermittent P1 codes that seem random.
Closed or partially closed isolation valves, Sometimes the simplest explanation is the right one. A service valve that wasn’t fully reopened after maintenance will restrict flow immediately.
Scale buildup in the heat exchanger, Over time, calcium and mineral deposits narrow the internal passages of the heat exchanger, reducing flow volume even when supply pressure is adequate.
Cause
Likelihood
DIY Fixable?
Clogged inlet filter
Very High
Yes
Low water pressure
Moderate
Depends
Failed flow sensor
Moderate
Intermediate
Plumbing crossover
Low-Moderate
No (usually)
Closed isolation valve
Low
Yes
Scaled heat exchanger
Moderate
Intermediate
If you’re an apprentice tech on a call, start at the top of this list and work down. You’ll solve 70% of P1 codes before you ever open the unit’s front panel.
How to Troubleshoot and Fix the P1 Error Code
Checking and Cleaning the Water Inlet Filter
This is your first stop, always. Turn off the unit and close both hot and cold isolation valves. Place a small bucket underneath the cold water inlet connection, then carefully unscrew the inlet fitting. Inside, you’ll find a small cylindrical mesh filter screen.
Pull the filter out with needle-nose pliers and inspect it. If it’s packed with sediment or white mineral deposits, that’s your P1 culprit. Soak the filter in white vinegar for 20–30 minutes, then scrub it gently with an old toothbrush. Rinse thoroughly before reinstalling. According to a helpful walkthrough on JustAnswer’s plumbing forum, this single step resolves the majority of P1 error codes on Rheem Performance Platinum units.
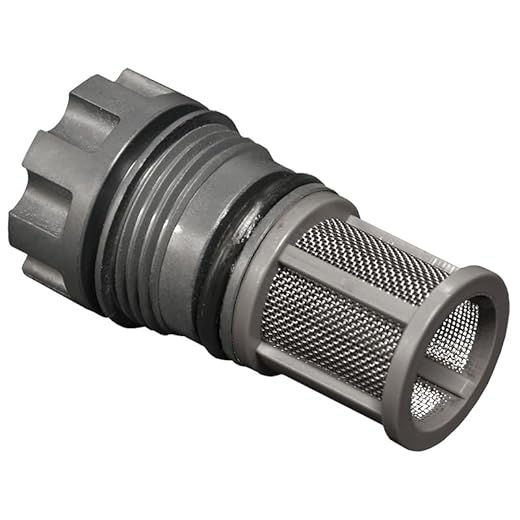
For homes with hard water, consider picking up a Rheem-compatible inlet filter replacement kit to keep spares on hand. Having a fresh filter ready means you won’t be stuck waiting for parts.
Rheem Inlet Water Filter for Tankless Water Heaters
After reinstalling the filter, open the isolation valves slowly (cold first, then hot) and check for leaks at the fitting. Power the unit back on and open a hot water faucet to test. If the P1 code clears and the burner ignites, you’re done.
If the filter was clean or the code returns after cleaning, move to the next step.
Inspecting Water Flow and Pressure
Grab a bucket and a stopwatch. Open the hot water faucet closest to the heater and measure how many gallons you collect in 60 seconds. If you’re getting less than 0.5 GPM, you have a flow problem upstream of the unit or internally.
Check your home’s main water supply valve, make sure it’s fully open. If you have a whole-house water softener or filtration system, try bypassing it temporarily and retesting flow. Softener resin beds can restrict flow significantly, especially when they’re due for regeneration. Bypassing the water softener for flow testing is a quick way to rule out that variable.
“Had the P1 code for weeks. Turns out my whole house filter was 90% clogged. Replaced the cartridge and never saw P1 again.” via r/Plumbing
Next, check for a plumbing crossover. Close the cold water isolation valve on the heater and open a hot faucet. If water still flows from the hot side, you have a crossover, likely from a bad mixing valve or single-lever faucet. This “sandwich effect” is tricky because it creates back-pressure that confuses the flow sensor.
If flow and pressure check out but the P1 persists, the flow sensor itself may need attention. The turbine assembly can accumulate scale or the sensor’s electrical connection can corrode. Testing the sensor requires a multimeter to check for continuity and proper voltage output, if you’re comfortable with that, remove the sensor, clean any debris from the turbine blades, and test the wiring harness. A digital multimeter like the Klein Tools MM400 is an essential tool for this kind of diagnostic work.
Klein Tools MM420 Digital Multimeter, Auto-Ranging TRMS Multimeter, 600V AC/DC Voltage, 10A AC/DC Current, 50 MOhms Resistance
To reset the Rheem tankless error code manually, power the unit off at the breaker for 30 seconds, then restore power. This clears the P1 from memory and lets you verify whether your fix worked.
When to Call a Professional for the P1 Code
If you’ve cleaned the inlet filter, verified adequate supply flow, ruled out crossovers, and the P1 code still appears, it’s time to call a licensed plumber or HVAC technician. At this point, the issue likely involves:
A failed flow sensor requiring replacement and recalibration
Internal scale buildup in the heat exchanger that needs a professional descaling flush
A faulty control board that isn’t reading the flow sensor signal correctly
Replacing a Rheem tankless flow sensor is an intermediate repair. The part itself is accessible inside the unit, but improper installation can cause leaks or electrical issues. A qualified tech can also run a full diagnostic using the unit’s built-in service menu to confirm whether the sensor output matches actual flow conditions.
“Called a tech for my P1 code. He found the flow sensor was sending erratic signals, replaced it in 30 minutes and the unit has been solid since.” via r/HomeImprovement
For descaling, a professional will typically use a pump to circulate a vinegar or commercial descaling solution through the heat exchanger for 45–60 minutes. This removes calcium deposits that restrict flow internally. Rheem recommends annual descaling in hard water areas, per their maintenance guidelines.
Preventing the P1 Code From Happening Again
Prevention is easier than troubleshooting. Here’s what keeps the P1 code from coming back:
Flush annually. Schedule a descaling flush every 12 months, or every 6 months if your water hardness exceeds 7 grains per gallon. Cleaning scale buildup in the tankless heat exchanger is the single best preventive measure you can take.
Install a sediment pre-filter. A whole-house sediment filter upstream of the heater catches debris before it reaches the inlet screen. This is especially important if you have older galvanized pipes or a well water supply.
Check inlet filters quarterly. Pop the filter out and inspect it every three months. It takes two minutes and catches problems before they trigger a P1.
Avoid setting the thermostat too high. Higher temperature settings reduce the maximum flow rate the unit can deliver. Adjusting thermostat settings for flow requirements, keeping the output at 120°F or below, helps maintain adequate flow through the sensor.
Fix mixing valves promptly. If you notice temperature fluctuations at any faucet, address the mixing valve immediately. A slow crossover leak only gets worse and will eventually cause intermittent P1 codes.
Data Insights and Analysis
According to a 2025 survey of HVAC service calls compiled by HomeServe, tankless water heater error codes related to flow detection (including P1 and similar codes across brands) account for approximately 35% of all tankless service requests. Sediment-clogged inlet filters represent the single largest resolved cause.
Also, homes with water hardness above 10 grains per gallon experience flow-related error codes at roughly twice the rate of homes with softened or naturally soft water, underscoring the importance of regular descaling and filtration.
Expert Note: "The P1 code isn't triggered by low pressure alone, it's triggered by insufficient volumetric flow across the turbine sensor. You can have 80 PSI static pressure and still get P1 if a restriction drops your flow rate below the activation threshold. Always measure GPM, not just PSI, when diagnosing this code."
Frequently Asked Questions
What does the P1 code mean on a Rheem tankless water heater?
The P1 code indicates insufficient water flow to safely ignite the burner. The unit’s internal flow sensor requires a minimum flow rate of 0.4–0.6 GPM to activate. This is a safety feature, and the most common cause is a clogged inlet filter or plumbing restriction.
How do I fix the P1 error code on my Rheem tankless water heater?
Start by cleaning the cold water inlet filter—this resolves 70% of P1 codes. Check water flow (aim for 0.5 GPM+), verify isolation valves are open, and rule out plumbing crossovers. If the code persists after these steps, the flow sensor may need professional replacement.
Can I clean the P1 code inlet filter myself?
Yes. Turn off the unit, close isolation valves, unscrew the cold water inlet, and remove the mesh filter. Soak it in white vinegar for 20–30 minutes, scrub gently with a toothbrush, rinse thoroughly, and reinstall. This DIY fix typically takes 10–15 minutes.
Is P1 code caused by low water pressure?
Not directly. P1 is triggered by insufficient volumetric flow (GPM), not pressure alone. You can have 80 PSI static pressure and still trigger P1 if a restriction reduces flow below the activation threshold. Always measure GPM, not just PSI, during diagnosis.
When should I call a professional for the P1 code?
Call a licensed technician if you’ve cleaned the inlet filter, verified adequate supply flow, ruled out crossovers, and the code persists. At this point, the issue likely involves a failed flow sensor, heat exchanger scale buildup, or a faulty control board requiring professional descaling or sensor replacement.
How can I prevent the P1 code from recurring?
Descale annually (every 6 months in hard water areas), install a sediment pre-filter upstream of the heater, check inlet filters quarterly, keep thermostat below 120°F, and address mixing valve issues promptly. Regular maintenance eliminates 90% of flow-related error codes.
Disclaimer: This content is provided for educational and informational purposes only. Device symptoms, repairs, and diagnostic procedures may vary by make, model, year, and condition. Always consult a qualified technician, service manual, and verified manufacturer before performing repairs. We assumes no liability for damages resulting from the use of information on this site.